(If you need) Uninstalling existing NVIDIA GPU Driver or CUDA
* Uninstalling existing CUDA installation
$ sudo apt-get --purge remove 'cuda*'
$ sudo apt-get autoremove --purge 'cuda*'
If there is folder, remove folder (check folder with $cd /usr/local )
$ sudo rm -rf /usr/local/cuda-11.0
$ sudo rm -rf /usr/local/cuda
* Uninstalling existing NVIDA GPU Driver
$ sudo apt-get remove --purge nvidia*
$ sudo apt-get autoremove
$ sudo apt-get autoclean
$ sudo reboot
1-A. Install NVIDIA GPU Driver (Auto Installation version)
$ sudo add-apt-repository ppa:graphics-drivers/ppa
$ sudo apt update
$ sudo ubuntu-drivers autoinstall
$ sudo reboot
1-B. Install NVIDIA GPU Driver (Manual Installation version, Recommended)
* Check your GPU device
$ sudo lshw -C display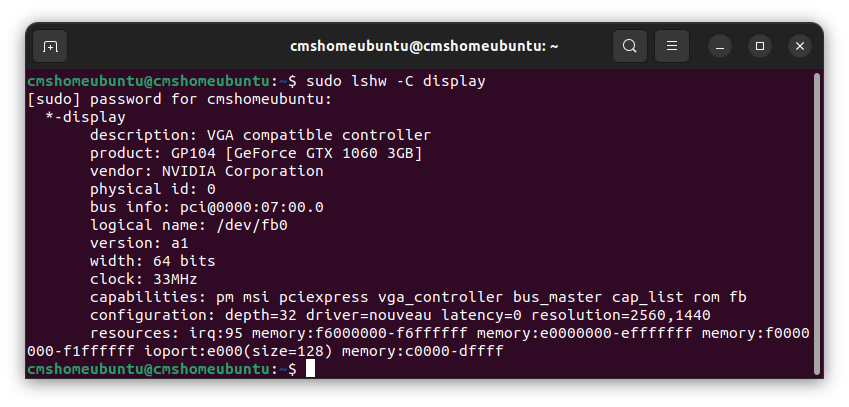
* Check your recommended GPU Driver version
$ ubuntu-drivers devices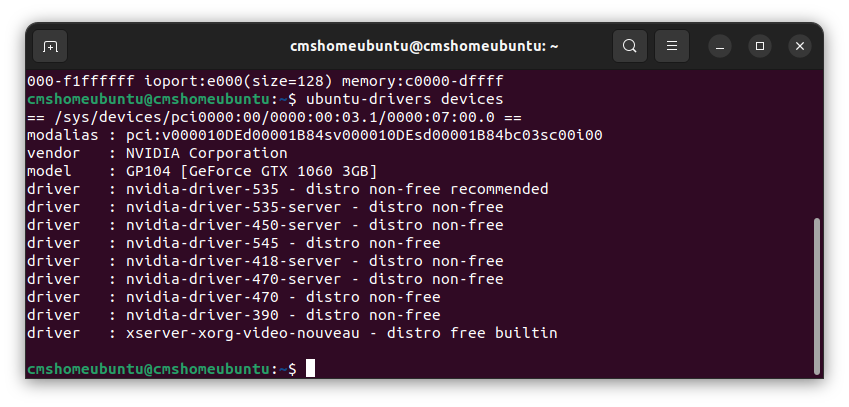
In above example image, the recommended GPU driver is nvidia-driver-535.
You can manually install GPU driver with following commands.
$ sudo add-apt-repository ppa:graphics-drivers/ppa
$ sudo apt update
$ sudo apt-get install nvidia-driver-535
$ sudo reboot
You can check GPU Driver installation with,
$ nvidia-smi2. Install CUDA
Before installing CUDA, you should check CUDA version corresponding with PyTorch.
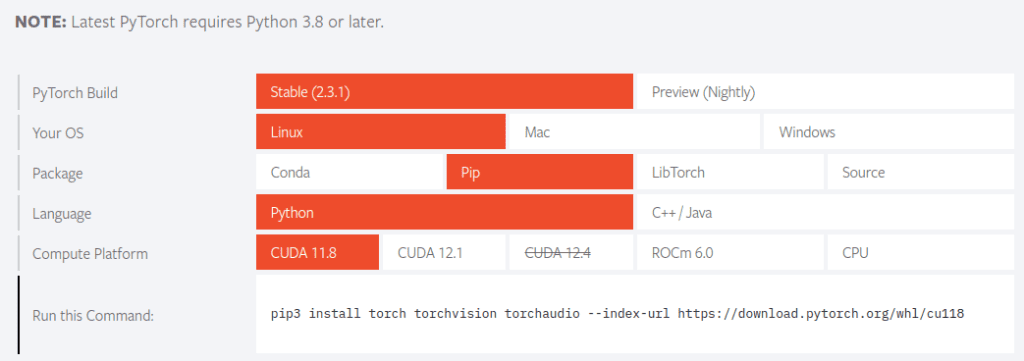
For installing PyTorch Stable (2.3.1), you need CUDA 11.8 or CUDA 12.1.
[Step 1] Check compatibility between NVIDIA GPU version and CUDA version.
https://docs.nvidia.com/cuda/cuda-toolkit-release-notes/index.html
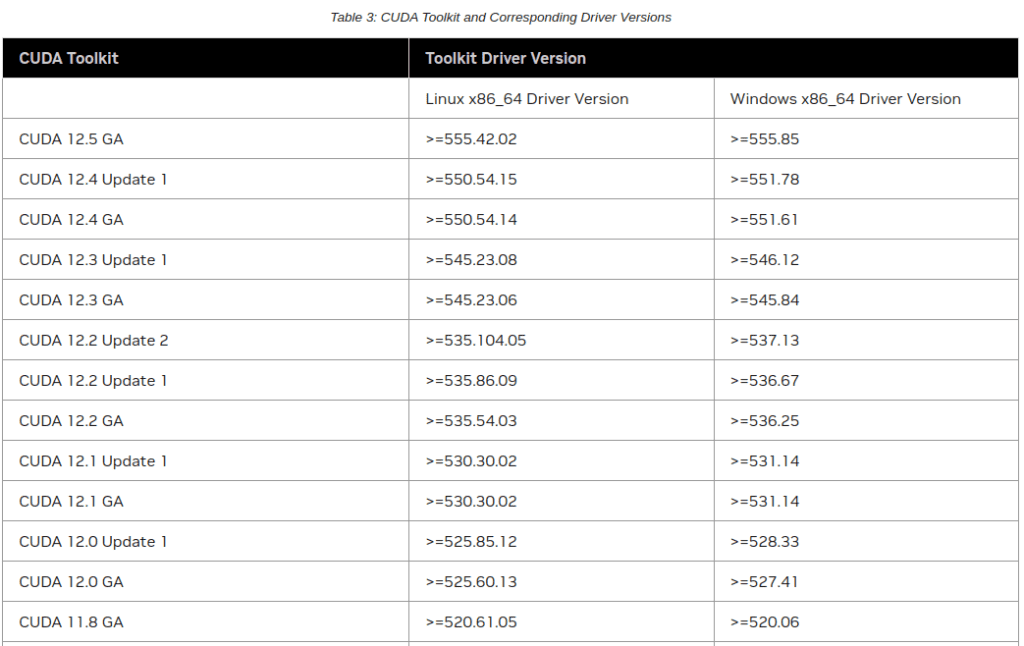
My NVIDIA GPU version is 535, which is compatible with either CUDA 11.8 or CUDA 12.1.
Please verify the compatibility of your GPU version with CUDA.
[Step 2] Enter CUDA Toolkit Archive and Download
CUDA Toolkit Archive : https://developer.nvidia.com/cuda-toolkit-archive
[Step 3] Linux – x86_64 – Ubuntu – 22.04 – runfile (local)
(Caution) If you don’t click ‘runfile (local)’, it will automatically install with the latest CUDA version.
$ wget https://developer.download.nvidia.com/compute/cuda/12.1.0/local_installers/cuda_12.1.0_530.30.02_linux.run
$ sudo sh cuda_12.1.0_530.30.02_linux.run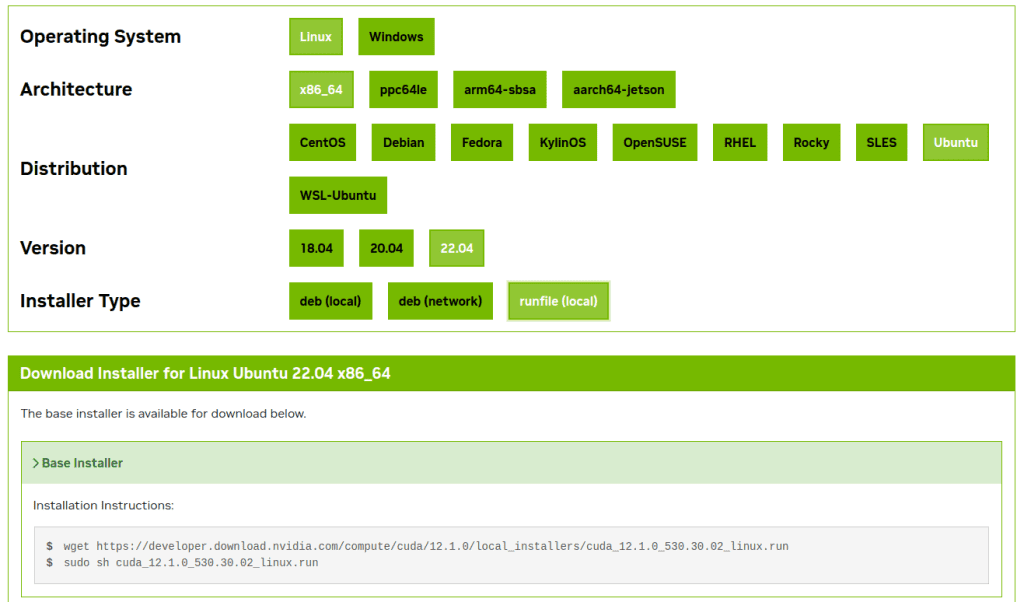
[Step 4] Existing package manager installation of the driver found. Continue? -> Continue
[Step 5] Do you accept the previously read EULA? -> accept
[Step 6] Graphic Driver Including Option (X : means installation)
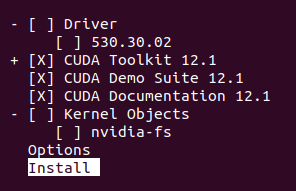
Do not select the installation option with driver (as we have already installed the GPU driver)
If the CUDA installation is successful, the terminal screen will appear as follows.
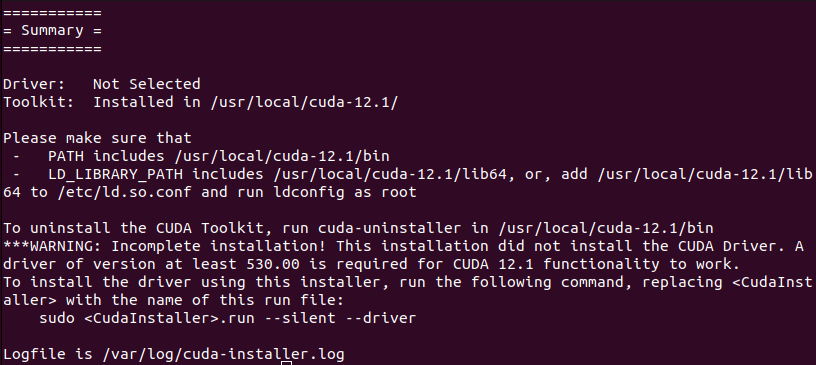
* If the installation fails due to a log-related error, execute the following command and then reinstall CUDA.
$ sudo apt install nvidia-cuda-toolkit (If you need)[Step 7] CUDA path
$ gedit ~/.bashrcCopy and paste the below contents, and save bashrc. (Change CUDA version according to yours)
export CUDA_HOME=/usr/local/cuda-12.1
export PATH=/usr/local/cuda-12.1/bin:$PATH
export LD_LIBRARY_PATH=/usr/local/cuda-12.1/lib:64$LD_LIBRARY_PATH
After that,
$ soucre ~/.bashrc3. Install PyTorch
From the official PyTorch homepage, you can check the options and install PyTorch with given commands.
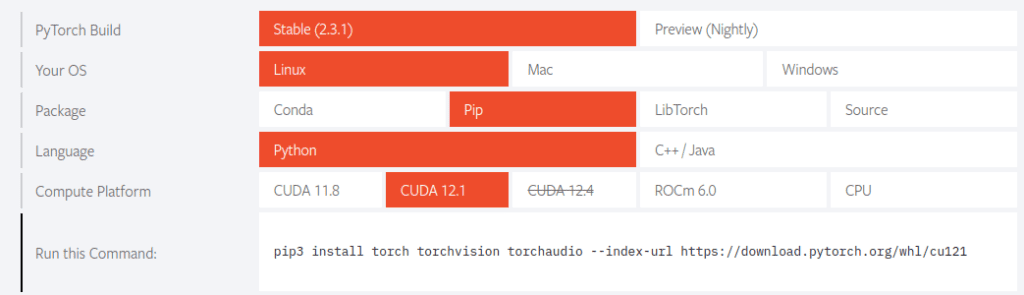
$ pip3 install torch torchvision torchaudio --index-url https://download.pytorch.org/whl/cu121
If the installation is successful, you can open Python and import torch as follows to check if the GPU is available.
$ python3

>>> import torch

>>> torch.cuda.current_device()
0

>>> torch.cuda.device(0)
<torch.cuda.device object at 0x775703d5bc40>

>>> torch.cuda.get_device_name(0)
'GeForce GTX 1060 3GB'

>>> torch.cuda.is_available()
True